Friday, December 23, 2011

Baklava: 101

Good Baklava is hard to beat.  I've tweaked this recipe over the years to satisfy my "food snobbery" taste.  I say "food snob" because my family tells me that is what I am.  In my defense, I'll eat just about anything...and to my knowledge, I don't complain.  I do however, on occasion, and ONLY when at a restaurant...verbalize what the cook/chef could have done differently to make the food better.  To me, this is in no way snobbery, but a deep seated appreciation for flavors.  My family has spread this heinous "food snob" nickname ad nauseum.  That being said, I know I have some friends who probably cringe at what I'm thinking when I eat their food.  Let me tell you what I'm thinking:  "I'm so thankful that someone has taken the time to cook for me and this could not be more PERFECT!"  (I only apply my "rigid" standards to myself and when I'm paying.)  
Baklava is really not difficult to make, it just has steps.  Do it once and you'll think:  "Ok.  That wasn't so difficult!"  I will say that I don't see too many Baklava recipes that call for cloves.  Don't skip it!  In my opinion, if it's not there, something is missing. 
Enjoy the Baklava recipe, and by all means...if it's not perfect to you...tweak away!

The recipe will follow, but I'll guide you through the simple steps.  First you want to prepare the filling, which I do in a food processor.  If you don't have one, just crush the crackers and walnuts however you normally would, and throw them in a bowl, along with the sugar and spices.  Have the filling handy.  Melt the butter and have that handy, too.  I first grease the pan (forgive my very well used, ugly pan) and place ONE sheet of phyllo dough in the bottom.  Brush butter over that sheet. 


Repeat the phyllo/butter process until you've used 1/4 of the dough (about 8 sheets).


Sprinkle 1/3 of the filling over the phyllo.  Repeat the phyllo/filling process 2 more times, and finish with a layer of phyllo on the top.


Using a sharp knife, cut the Baklava into diamonds.  Pour any remaining butter over the top.


Pop that baby into a 325* oven for 45 to 50 minutes.   The top should be golden. (My oven looks like it doesn't cook very evenly, but the color on the left half is perfect.)   While it's baking, boil the syrup for the top.


As soon as it comes out of the oven, pour the syrup evenly over the top.


Leave it to soak it all in.  I usually don't eat the Baklava until the next day, but I don't see why you couldn't dig in as soon as it cooled.

Yum!

Kris’ Baklava!


• 4 c finely chopped walnuts

• ¾ c sugar

• 1 T ground cinnamon

• ¼ tsp ground cloves

• ½ sleeve Ritz crackers, crumbled

• 2 sticks (1 cup) margarine or butter, melted

• 1 (16oz) pkg phyllo dough, thawed

• 1 ¾ c sugar

• 1 ½ c water

• 2 T lemon juice

Mix first 5 ingredients together in a bowl (or process in a food processor). Set aside. Brush bottom of a 9x13 baking dish with some of the melted butter/margarine. Layer ¼ of the phyllo sheets in pan, brushing each with melted butter/margarine.*  Sprinkle about 1 ½ cups of the filling (one third of filling) over the sheets, and repeat layering phyllo and filling 2 more times. Layer remaining phyllo on top, and drizzle any remaining butter/margarine over the top.

Using a sharp knife, cut the baklava into diamonds and bake in a 325* oven for 45 to 50 minutes. While it is baking, combine the last 3 ingredients in a saucepan. Bring to boil, reduce heat and simmer for 20 minutes. Poor over warm baklava and cool completely.

*  I do tend to use margarine more when I'm cooking.  (See, I'm not that snobby.)  If only real butter floats your boat, by all means, use it!  I want nothing but real cream in my coffee.  I get it!  We like what we like, right?
 
Enjoy!

Tuesday, December 13, 2011

This decade's Christmas Card!

I haven't made a Christmas card in years.  It's not that I'm not feeling the need to spread Christmas cheer...it's just that, well...I just haven't.  I won't bother you with my million and a half excuses.  I'll just show you the card that I made on Shutterfly.  Now, If I manage to get them before Christmas; and then I manage to get a few addressed and stamped; and then I manage to actually get them to a mailbox...well...now that will be a true Christmas miracle!
Merry Christmas Everyone!


Photo Card
View the entire collection of cards.

Thursday, December 1, 2011

Clover Leaf Dinner Rolls

This recipe has been handed down for a few generations.  I call it "Mildred Fredrick's Dinner Rolls," because that is the lady that gave my mother the recipe.  I'm not at all sure who she is...I think maybe the mother of an aunt or something.  Anyway, they are the most fabulous dinner rolls.  If a better roll recipe exists, I just haven't found it yet...not that I'm looking...

I'll post the recipe below, but for now, I'll just walk you through the steps to make the clover leaf shape.  It really is quite simple, but I've been making these rolls since I was a child, so I really probably shouldn't make the "easy" claim so readily.  Depending on the dough temperature, and a thousand other factors, it could be tricky. Please don't let that stop you!  You'll be sorry!

The dough is mixed up the night before, then tucked into the fridge in a HUGE, greased bowl with a lid or piece of Saran wrap covering the top.  I always give the top of the dough a squirt of cooking spray to keep it from drying out.  The next day, you'll want to get the dough out of the fridge and let it warm up just a bit, but you do NOT want the dough to be warm.  If the dough is too warm, it will be harder to form.  You just don't want to freeze your hands off while forming the dough balls.
Grease your hands liberally (I use butter flavor Crisco) and pull off a good hunk of dough.


For now and for the remainder of these photos, please ignore my ugly, greasy paws!  Macro photography and grease does nothing for making one's hands look beautiful.  Pretend you have a blob of silly putty and just push the dough up through your hands to just make a smooth side to it.  (You are not kneading the dough...just smoothing it out.)  The best description I can think of is like what your tongue does to bubblegum when you're forming it to blow a bubble.  Get it now?


Wrap one fist around that smooth "bubble"  and push a little dough through.


Squeeze your fist closed to "poop"  out a little ball.  I'm not trying to be gross here, just incredibly descriptive.  Thanks for sinking to my level for a few moments...


Pinch off a ball the size of an English walnut and plunk it into a greased (I just use cooking spray) muffin tin. 


You will want 3 balls in each cup...unless you are an over-achiever and want your clovers to have four leaves.  I In this case, your balls will have to be smaller.  *Snicker*  (Sorry!  I'm immature and couldn't help it.)


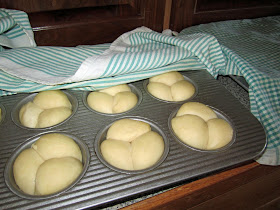
Place the tins in a warm, draft free place.


Cover them up with some clean dish towels. 


Check them in about an hour and see how they are doing.  You can bake them at this point, but if you have time to spare, give them a while longer.


Now we're talking! (This photo taken from a previous batch when I obviously had more time.)


Pop them in a 375 degree oven for 20 minutes.  I usually rub a stick of butter over the tops as soon as they come out of the oven.  Not necessary, but it helps keep the tops from drying out, and really, can you have too much butter? 


Dump them out into a basket (you don't want sweaty rolls) and smack the hands that start to grab!


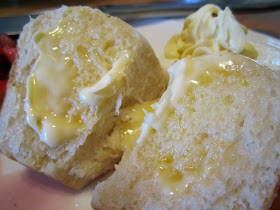
Clover leafy goodness!


With butter?  Even better!

Recipe:
Dinner Rolls
2 pkgs (4 tsp)  instant yeast
1 c cold water
2 eggs
3/4 c sugar
2 tsp salt
1/2 c margarine
1/2 c butter flavor Crisco
1 c boiling water
7 1/2 c all purpose flour

directions:
In a large mixing bowl, dissolve the yeast in the cold water and beat in the eggs.
In another bowl, combine the sugar, salt, margarine, Crisco with the boiling water and stir to melt the fats.  Let this mixture cool to warm (think baby bath temperature).  Add this to the yeast mixture and then stir in the flour.  I now mix mine in a stand mixer with a dough hook, but did it with a wooden spoon and bicep power for years.  You may need more or less flour, but I've found that 7 1/2 cups consistently works for me.  Put the dough in a very large, greased, covered bowl in the fridge overnight.
The next day, form rolls as described above.

This recipe will easily make 24 rolls, but I like to make a double batch so that we can fry up the dough in the morning and have dough cakes with butter and jam.  Holy deliciousness!
Enjoy! 

Friday, November 11, 2011

Veteran's Day, 2011

I took this picture with my phone back in July, but I thought it was perfect for today.


Yesterday was a pretty special day.  My kids are off school today, Veteran's Day, so yesterday they had an assembly at the high school and invited all of the veterans that work with the school district to come and let the kids and community members honor them.  We had a stage full of vets...and not all of them were able to make it.  It was a great ceremony and many were touched by the power point that was put on by the media class in which they interviewed  several district employees that served in the military. 
The real highlight, however, was that yesterday was also our first graduation ceremony of the school year.  You see, the state of KS has made it possible to grant high school diplomas to qualifying veterans of WWII and the Korean war, who for different circumstances (usually because they were overseas serving our country) never got to graduate when it was their time.  Yesterday, we had the opportunity to honor one of those men.  He had no idea that when he came to the ceremony, he was also attending his own graduation.  They supplied him with a cap and gown, and a well earned diploma.  Many thanks to our local VFW and Tonganoxie High School for filing the paperwork to make this happen.  My oldest daughter said she cried four times during the assembly.  I think that that pretty much sums it up.
Thank you to all of the vets who have served our country, buying us the freedom that we so often take for granted. 

Saturday, October 8, 2011

A field that's over the hill...

The sunflowers have mostly lost their petals.


Right now, they are just busy making seed
and trying to stand up to all of the wind that we've been having.


What was once beautiful now looks pretty sad.


In about a month (hopefully less) the flowers will be harvested for seed. 
Hopefully we will get them before the flocks of birds move in to help themselves.

Friday, September 16, 2011

Sunflowers

The sunflowers are still in various stages of blooming.


Some are still opening up, and others probably won't open before they get frosted.


The first flowers to open are getting fat with seed.


Some have personality.


Friendly little guys!


Sunday, September 11, 2011

Friday, September 9, 2011

Yellow!

Well, this weekend is as yellow as it gets for this year.


Less yellow than years past, but still not a bad show.


I'll just leave you with a few shots.


Enjoy!

Monday, September 5, 2011

Sunflowers Labor Day

The sunflowers are about midway in the blooming, I'd say.


I still think that next weekend is going to be more yellow, overall, but there will be many sunflowers out there that are past their prime.


We have pockets of flowers that are all opened up now, but many yet to come.


The bees are happy.  Every time I see a bee on a sunflower, I think that the camouflage is so perfect, that bees were just designed with sunflowers in mind.


This is still my favorite stage of "opening."  Fresh, new, and not yet chewed on by bugs.


But this isn't bad, either.

Wednesday, August 31, 2011

Sunflowers, August 31st!

We have a few sunflowers popping open!

Mostly, the field is still very green.

There are still some great photo opportunities as the sunflowers make good shots in all stages of "yellow."

So pretty.

Ooohh!

Ahhhh!

Friday, August 26, 2011

Sunflowers Today, August 26th!

Just giving you an update on the sunflowers as of 9 a.m. this morning.

The field is looking more filled in as the sunflowers fill out...but if you walk out among them, you'll see sunflowers in all stages of growth.  We still have many that are only a few inches tall.

But this is the exciting part!  We have buds!

The majority of the flowers look like this.

These will bloom in about a week (maybe plus a few days).