Monday, May 16, 2011

Wolf Spiders!

So, for Mother's Day, I asked my hubby to please bring me some mulch...but NOT bulk mulch because then I would have a pile to contend with and it would involve much more labor on my part.  I didn't relish the thought of deciding where to put the pile; shoveling the pile; all the trips back and forth to the pile
(you get my drift, here)...
So, what did he bring me?  Bulk mulch, of course!  (Gee!  Thanks, honey!)
I decided to just shut up and make it work...maybe after just a little groaning and complaining.  After all, it was much better mulch then what I am accustomed to, which is what the county chips up from pruning roadsides, and leaves in massive heaps for us when we tell them it's ok to deposit some on our farm.  (Just can't say no to free mulch.)   But what I completely forgot about, was that no matter the quality of mulch, if it's in a heap, you will most likely get a few of these:
Wolf spiders!

 I had scooped up some mulch with my hands and thrown it into a 5 gallon bucket.  I just needed a little bit to put some in the tops of some flower pots.  I was happily reaching into the bucket for mulch and was almost to the bottom of the bucket when I happened to look in.

Although I didn't relish the thought that I had been playing keep away with this spider, I'm certain that she was much more afraid than I was.  After all...she had her babies with her!  Wolf spiders are kind of really cool in that they attach their egg sacks to their spinnerets and carry them around with them to guard.  They even hunt this way.  After the babies emerge from the sack, they will climb up her legs and ride around on her abdomen for a time.  (I can't imagine carrying around hundreds of offspring!) 

After terrifying her some more with my camera, I let her out into my garden.

She had a hard time getting over this dried stem with the egg sack in tow.

She was very gentle with it.

After eventually winning her battle with the stem, she found a nice leaf to crawl under to hide from me. 
I can't blame her one bit!

Wednesday, April 6, 2011

Winter Wheat

 We plant "Hard Red Winter Wheat" in the fall.  That's a long name for a grain, but wheat is named for the growing season, the gluten content, and the color.
 Hard wheat has a high protein content and is used predominantly for all-purpose flour.
 Wheat that is planted in the fall sprouts, grows a few inches, and then lays dormant for the winter.
 Then in the spring, it looks like this! 
Lush, lovely greenness...when everything else around is still brown and ugly.
It will be harvested in late June or early July...hopefully before the fireworks start for Independence Day celebrations.  It's always a race.  By then the wheat will be fully ripe and...dry.  (Fireworks and wheat fields are a bad combination.)  But for now, I'm going to enjoy the green!

Monday, January 31, 2011

What's in a Tree?

Ted's mom and dad's house was recently featured in Lawrence Magazine.  The gist of the article is that they used all native lumber off of our own farm in the finishing process.  The floors, the woodwork, the cabinets, etc., were all made using what we had on hand.  If you remember from a previous blog that we fell our own trees and then we hire a portable saw mill to come in and saw up the logs.  The boards then get stacked for drying and when we feel the need to make something pretty, it's there.  
If you'd like to see the article and get a glimpse of the house and see what logs like these can become,
click here.  You'll have to scroll to page 12 where the article begins
(or 15 if you go by the toolbar at the top.). 
It's called "Farming Elegance."  For those of you wondering, we don't just cut down trees.  Ted's dad, Jim, plants lots of trees, acorns, and seeds.  (Acres of them!) 

Wednesday, January 12, 2011

Super Easy Baked Mac n Cheese

This Mac n Cheese could not be any simpler!  You just throw the ingredients in a pan and stick it in the oven.  It's the ultimate in comfort food.

 You will need:
2 cups uncooked elbow macaroni
6 Tablespoons butter or margarine
12 ounces grated cheddar cheese
4 ounces mozzarella cheese
5 cups milk
salt and pepper to taste


Preheat the oven to 350*F.
Mix the macaroni and the cheeses up in a sprayed 9 X 13 inch baking dish.  Cut the butter up into small pieces and scatter over the top.  Pour in the milk and add salt and pepper to your liking.

 Bake for 1 hour.

How easy was that? 

Sunday, January 9, 2011

Baked Cake Doughnuts

Because sometimes, you just have to have a doughnut.
You see, I do not live "in town." Not that driving to town on a doughnut run would be a huge deal, but I'm a very impatient person when I'm hungry. If I'm going to wait, I'd rather be doing something constructive, and I can whip up these doughnuts faster than I can get presentable (that means throwing on a pair of sweats with no holes, locating a baseball cap to cover up my bead head, and wiping the mascara out from under my eyes), driving to town, buying doughnuts (and whatever else I think I need because I have to somehow justify driving to town for more than just doughnuts), and getting back home just to realize that I forgot to make a pot of coffee...and now I have cold doughnuts. So, a country girl has to do what she has to do!
Here's my recipe for doughnuts:
Baked Doughnuts:
2 cups flour
3/4 cup sugar
2 teaspoons baking powder
1/4 teaspoon nutmeg
1 teaspoon salt
3/4 cup "sour" milk*
2 eggs
1 teaspoon vanilla
2 Tablespoons melted shortening
(I use butter flavor Crisco...I think the butter flavor is essential so if you don't have it, use margarine or butter.)
*to make "sour milk," simply add a teaspoon of vinegar to your milk, stir, and let it sit for about ten minutes.
Preheat the oven to 400*F.
Combine the flour, sugar, baking powder, nutmeg, and salt in a medium mixing bowl. In another bowl, mix the sour milk, eggs, vanilla, and melted shortening. Pour the wet ingredients into the dry and stir until just combined. Spray a doughnut pan (or two depending on the size of your doughnuts) and fill the cavities 3/4 full with the batter. Bake 8 to 10 minutes.
When done, pop doughnuts out of the pans and then dunk each in butter, and roll in the cinnamon/sugar mixture.
For topping:
1/2 cup melted butter
3/4 cup sugar
1/4 cup brown sugar
1 Tablespoon cinnamon
The topping is not an exact science, you could glaze them if you like, but the cinnamon/sugar is a real pleaser. Also, I have some fancy doughnut pans (and this recipe makes 9 regular sized doughnuts), but you could easily make these in muffin tins. Just fill the cups half full, and you will get smaller "doughnuts" but you will have more portions. Just remember to adjust cooking time depending on your pan.
Enjoy!

Sunday, November 14, 2010

Sourdough Dutch Oven Bread

I've been on a quest to make bread at home that rivals the artisan loaves that I get at our local stone oven bakery. I think I've finally done it! The secret is to bake the bread in a covered dutch oven for part of the cooking time. It makes a wonderfully chewy crust. Just a note on the dutch oven:  Mine is a Lodge brand. Don't be fooled by its knob. The phenolic knob that comes with the pot is not oven safe, but it is easily replaced with a $10 LeCruset stainless steel knob bought from Amazon.
This recipe is made with a sourdough starter (use your favorite or I'll supply you with a recipe at the bottom), and milled flax seed. Milled flax seed gives the bread a nice flavor and adds some wonderful looking specks of color. (I am able to buy Hodgson Mill brand at my local gracery store.) Also a note on measuring the flour: I'm of the school that lightly spoons the flour into a measuring cup to overflowing and then uses a knife to level off the top. You'll get the right amount every time that way.
I once reprimanded my daughter for just scooping flour out of the canister with the measuring cup. She insisted it must be the same amount of flour as doing it my way. After a brief experiment, she concluded that her way yielded almost 1/4 cup more than measured my way. She is now as anal about measuring flour as I am. (I couldn't be more proud!)
Here's the recipe that I developed to fit my 6 quart dutch oven:

Sourdough Dutch Oven Bread
2/3 cup sourdough starter
1 cup warm water
2 teaspoons rapid rise yeast
1 teaspoon sugar
1 teaspoon salt
1/3 cup milled flax seed
3 2/3 cup unbleached all-purpose flour

Combine the starter, water, yeast, sugar, and salt in a large mixing bowl.
Stir in the milled flax seed and the flour. Knead the dough until it sticks together and pulls away from the side of the bowl. (I put my dough in the Kitchenaid and knead it with a dough hook for 5 minutes, but you can do it the old-fashioned muscle-building way and it will work just fine.)

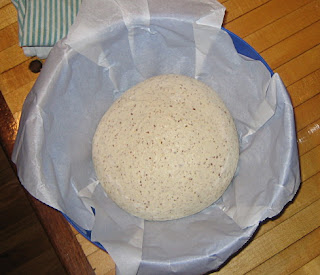
Place the dough in a greased (I spray mine) bowl and cover with a lid or plastic wrap. Let it raise for about 2 hours.

It should at least double in size, although mine usually triples in size because I don't have time to babysit dough. (I have lots of important things to do like laundry and scrubbing toilets.) Line a medium mixing bowl (about the same size as your dutch oven) with parchment paper and set it aside.
Punch the dough down.
Turn it out onto a floured surface and knead it very briefly...more to shape the dough and to get rid of any air bubbles.
Form it into a ball. Place the ball seam side down into the parchment lined bowl.
Cover it with a kitchen towel and let it raise until doubled in size.
At least 20 minutes before the dough is ready, put your dutch oven in the oven and pre-heat it to 475* F. When the oven is ready, slice the top of your dough with a very sharp knife. Just make a 1/4 inch deep slit in the top. If your knife is sharp enough, it won't drag. This slit helps the dough "pop" in the oven. Carefully lift the dough out with the parchment paper and place it in the dutch oven. Place the lid on the dutch oven and bake for 30 minutes.
Remove the lid (I leave the lid in the oven to prevent cracking the enamel from thermal shock) and bake for another 20 minutes. Remove the bread from the oven (again, I leave my pot in the oven to cool), remove paper, and cool the bread on a wire rack for at least one hour before slicing. (If you slice into the bread too soon, it will become hopelessly gummy.
After you've patiently waited an hour, go ahead and enjoy.

Sourdough Starter:
2 cups warm water
1 tablespoon sugar or honey (optional)
2 cups all-purpose flour
1/2 teaspoon dry yeast
Beat all ingredients in a 2 quart bowl. Cover the bowl with a cheesecloth and leave it on the counter for 3 to 5 days, stirring it daily. When the bubbles diminish and it developes a sour, yeasty aroma, it's ready to use.

Ingredients:

2/3 cup sourdough starter
1 cup warm water
1 teaspoon sugar
1 teaspoon salt
2 teaspoons rapid rise yeast
1/3 cup milled flax seed
3 2/3 cup unbleached all-purpose flour

Directions:

In a large mixing bowl, combine starter, water, sugar, salt and yeast. Stir in the milled flax seed and the flour. Knead dough for five minutes. (I use a dough hook and mixer for this, but you don't need to.) Place dough in a greased bowl, cover with plastic wrap, and let raise for 2 hours. Punch the dough down, turn onto a lightly floured surface and knead briefly to shape into a ball. Place ball in a bowl lined with parchment paper, cover with a kitchen towel, and allow to raise until double in size. (about 1 to 1 1/2 hours.) 20 minutes before the dough is ready, place an empty 6 quart dutch oven in the oven and pre-heat to 475* F. When oven is ready, slit top of loaf 1/4 inch deep with a very sharp knife. Carefully place dough (still in parchment paper) into hot dutch oven, cover with lid, and bake for 30 minutes. Remove the lid and bake another 20 minutes. Remove bread from dutch oven and cool on a wire rack for at least 1 hour before slicing.  


Friday, October 29, 2010

YeeeeeeHaaaawwwwww!!!

I don't exactly know when it started. It was before I came onto the scene twenty some odd years ago. What I'm talking about is "the Big Yee Haw."
But first, let me digress just a bit:
When I first married a cute, young, buff farm boy, the farm had two-way radios. It was before the days of cell phones and that's how we communicated with each other. The equipment all had radios in them, and our houses did, too. We shared a band with our neighbors, so we could hear them and they could hear us. We had to initiate a conversation by stating our "call letters." I still remember them: "K O K seven-twenty calling Ted..." This system worked great...if the person you were calling was actually near a radio at the time.
Anyhoo, You can imagine my startlement when I was sitting at home that first year, minding my own business, when all of a sudden someone breaks protocol and just hollers a very loud "YeeeeeeeeeeHaaaaaawwwwwww!" over the radio. (It was my father in law.)
When the hubby came home later, he explained to me that that was meant to express the joy and exuberation one felt knowing that the last of the crops were out of the field. One no longer had to fret over rain forecasts and broken equipment. It was a moment of pure relief.
Well, the two-ways are now long gone, (well, actually, they are probably sitting in a box somewhere, but you get my meaning) so it's not as particularly penetrating, but the big Yee Haw now comes over the cell phone...but it does still come! I just got the call this evening.

I absolutely treasure those words! It means that the hubby will be more relaxed. It means that he will work shorter days. It means that we will spend more time together doing fun things as a family. It means that I could write a list of honey-dos and they might actually be taken seriously. It means that this hot young buck:

Could take this cute young thing:

Out on a REAL DATE!!! Complete with dinner, drinks...the works!

But for that, we will leave these gorgeous beauties at home!

(sorry kids!)