Sunday, November 14, 2010

Sourdough Dutch Oven Bread

I've been on a quest to make bread at home that rivals the artisan loaves that I get at our local stone oven bakery. I think I've finally done it! The secret is to bake the bread in a covered dutch oven for part of the cooking time. It makes a wonderfully chewy crust. Just a note on the dutch oven:  Mine is a Lodge brand. Don't be fooled by its knob. The phenolic knob that comes with the pot is not oven safe, but it is easily replaced with a $10 LeCruset stainless steel knob bought from Amazon.
This recipe is made with a sourdough starter (use your favorite or I'll supply you with a recipe at the bottom), and milled flax seed. Milled flax seed gives the bread a nice flavor and adds some wonderful looking specks of color. (I am able to buy Hodgson Mill brand at my local gracery store.) Also a note on measuring the flour: I'm of the school that lightly spoons the flour into a measuring cup to overflowing and then uses a knife to level off the top. You'll get the right amount every time that way.
I once reprimanded my daughter for just scooping flour out of the canister with the measuring cup. She insisted it must be the same amount of flour as doing it my way. After a brief experiment, she concluded that her way yielded almost 1/4 cup more than measured my way. She is now as anal about measuring flour as I am. (I couldn't be more proud!)
Here's the recipe that I developed to fit my 6 quart dutch oven:

Sourdough Dutch Oven Bread
2/3 cup sourdough starter
1 cup warm water
2 teaspoons rapid rise yeast
1 teaspoon sugar
1 teaspoon salt
1/3 cup milled flax seed
3 2/3 cup unbleached all-purpose flour

Combine the starter, water, yeast, sugar, and salt in a large mixing bowl.
Stir in the milled flax seed and the flour. Knead the dough until it sticks together and pulls away from the side of the bowl. (I put my dough in the Kitchenaid and knead it with a dough hook for 5 minutes, but you can do it the old-fashioned muscle-building way and it will work just fine.)

Place the dough in a greased (I spray mine) bowl and cover with a lid or plastic wrap. Let it raise for about 2 hours.

It should at least double in size, although mine usually triples in size because I don't have time to babysit dough. (I have lots of important things to do like laundry and scrubbing toilets.) Line a medium mixing bowl (about the same size as your dutch oven) with parchment paper and set it aside.
Punch the dough down.
Turn it out onto a floured surface and knead it very briefly...more to shape the dough and to get rid of any air bubbles.
Form it into a ball. Place the ball seam side down into the parchment lined bowl.
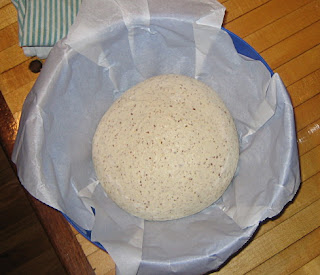
Cover it with a kitchen towel and let it raise until doubled in size.
At least 20 minutes before the dough is ready, put your dutch oven in the oven and pre-heat it to 475* F. When the oven is ready, slice the top of your dough with a very sharp knife. Just make a 1/4 inch deep slit in the top. If your knife is sharp enough, it won't drag. This slit helps the dough "pop" in the oven. Carefully lift the dough out with the parchment paper and place it in the dutch oven. Place the lid on the dutch oven and bake for 30 minutes.
Remove the lid (I leave the lid in the oven to prevent cracking the enamel from thermal shock) and bake for another 20 minutes. Remove the bread from the oven (again, I leave my pot in the oven to cool), remove paper, and cool the bread on a wire rack for at least one hour before slicing. (If you slice into the bread too soon, it will become hopelessly gummy.
After you've patiently waited an hour, go ahead and enjoy.

Sourdough Starter:
2 cups warm water
1 tablespoon sugar or honey (optional)
2 cups all-purpose flour
1/2 teaspoon dry yeast
Beat all ingredients in a 2 quart bowl. Cover the bowl with a cheesecloth and leave it on the counter for 3 to 5 days, stirring it daily. When the bubbles diminish and it developes a sour, yeasty aroma, it's ready to use.

Ingredients:

2/3 cup sourdough starter
1 cup warm water
1 teaspoon sugar
1 teaspoon salt
2 teaspoons rapid rise yeast
1/3 cup milled flax seed
3 2/3 cup unbleached all-purpose flour

Directions:

In a large mixing bowl, combine starter, water, sugar, salt and yeast. Stir in the milled flax seed and the flour. Knead dough for five minutes. (I use a dough hook and mixer for this, but you don't need to.) Place dough in a greased bowl, cover with plastic wrap, and let raise for 2 hours. Punch the dough down, turn onto a lightly floured surface and knead briefly to shape into a ball. Place ball in a bowl lined with parchment paper, cover with a kitchen towel, and allow to raise until double in size. (about 1 to 1 1/2 hours.) 20 minutes before the dough is ready, place an empty 6 quart dutch oven in the oven and pre-heat to 475* F. When oven is ready, slit top of loaf 1/4 inch deep with a very sharp knife. Carefully place dough (still in parchment paper) into hot dutch oven, cover with lid, and bake for 30 minutes. Remove the lid and bake another 20 minutes. Remove bread from dutch oven and cool on a wire rack for at least 1 hour before slicing.  


Friday, October 29, 2010

YeeeeeeHaaaawwwwww!!!

I don't exactly know when it started. It was before I came onto the scene twenty some odd years ago. What I'm talking about is "the Big Yee Haw."
But first, let me digress just a bit:
When I first married a cute, young, buff farm boy, the farm had two-way radios. It was before the days of cell phones and that's how we communicated with each other. The equipment all had radios in them, and our houses did, too. We shared a band with our neighbors, so we could hear them and they could hear us. We had to initiate a conversation by stating our "call letters." I still remember them: "K O K seven-twenty calling Ted..." This system worked great...if the person you were calling was actually near a radio at the time.
Anyhoo, You can imagine my startlement when I was sitting at home that first year, minding my own business, when all of a sudden someone breaks protocol and just hollers a very loud "YeeeeeeeeeeHaaaaaawwwwwww!" over the radio. (It was my father in law.)
When the hubby came home later, he explained to me that that was meant to express the joy and exuberation one felt knowing that the last of the crops were out of the field. One no longer had to fret over rain forecasts and broken equipment. It was a moment of pure relief.
Well, the two-ways are now long gone, (well, actually, they are probably sitting in a box somewhere, but you get my meaning) so it's not as particularly penetrating, but the big Yee Haw now comes over the cell phone...but it does still come! I just got the call this evening.

I absolutely treasure those words! It means that the hubby will be more relaxed. It means that he will work shorter days. It means that we will spend more time together doing fun things as a family. It means that I could write a list of honey-dos and they might actually be taken seriously. It means that this hot young buck:

Could take this cute young thing:

Out on a REAL DATE!!! Complete with dinner, drinks...the works!

But for that, we will leave these gorgeous beauties at home!

(sorry kids!)

Thursday, October 14, 2010

Perspective

How big is a combine?

This video helps to give a little perspective.

Monday, October 4, 2010

You gotta try this!

Pepperoncini Beef!
I like amazing things. This is amazing.
Take a 3 pound (or whatever) boneless roast and cut 6 shallow slits into it. Stick in 6 cloves of garlic. Plunk that sucker into a crock pot.
Open up a 16 ounce jar of pepperoncini and dump it over the top of the roast...liquid and all.
Cover it and cook it on high for about 6 hours...or whatever.
Shred the meat with a couple of forks.
Serve it up on grilled buns with a few of the peppers and some Monterey Jack cheese.
Good heavens but this is good!
Take note: I am one of THOSE kinds of cooks that will give instructions like "cook it 'til it's done." I realize that drives some people crazy, but it's how my momma raised me. I don't believe in exact measurements or cooking times unless I'm baking. I really don't think this recipe can get messed up too much. Enjoy! It's fabulous.

Sunday, October 3, 2010

Corn Harvest

Corn harvest has been ongoing for a couple of weeks now. The corn dried down early this year (despite the late planting) because of the excessive, prolonged heat we had in July. Regardless of the corn being ready, we couldn't begin harvest because it started raining just as soon as the corn was ready. That's the way it goes sometimes.
I snapped a few shots the other day as I was performing one of my daily duties...lunch delivery. This is the grain cart unloading into the International grain truck. (Farmers call it a straight truck. One of these days I'll learn all of the terminology...)
Here comes Ted in the combine. (He must smell food!)
He normally wouldn't drive back across the field, but I wasn't driving a farm truck. (I had errands to run, kids to take to town, tractor parts to pick up, yadda, yadda... And there is no way I'm driving across a corn field in MY car!)

" Hello, Honey! I brought you some leftover pizza and a gooey homemade cinnamon roll.)
This is the thanks I get!

Sunday, September 5, 2010

Going downhill...

Overall, the sunflower field is starting to look a little scraggly. The first flowers to open are now plump with seed, and looking at the ground.
The flowers that were part of the "re-plant" are just starting to open up.
It's unusual to see sunflowers side by side in two completely different stages of development, but that's what we have this year.
These former beauties are now huge with seed.

This baby has yet to open up. So much life ahead of it...well, a couple more weeks, anyway.

This is my favorite stage, if you haven't guessed from all of the snapshots. I just love how hopeful they look when they are just opening up.

Saturday, August 28, 2010

Sunflower Saturday

The sunflowers are still looking good!
Many have not opened yet, due to the varied planting times,
but many more are ready for the shooting...or picking...
The field is more green than usual this year, but they are still wonderful.
This picture really doesn't do them justice.

This picture, however, does.

This one, too! (click on the photo)
We are scheduled to take our family picture in the sunflowers tomorrow morning. If you happen to be at the field, and happen to be really good with a camera, come on over and offer to press a button for us. (It would save me setting the camera on "auto" and then making a mad dash across the field to get in the picture before the camera captures my backside!)
Enjoy!

Saturday, August 21, 2010

Just a quick link for you

The link is to a story that the Lawrence Journal World did on Ted and the sunflowers that appeared in today's paper:

Thursday, August 19, 2010

For your viewing pleasure...

I've had these pictures in my camera for a couple of days now, but I've not had access to my desktop computer. You see, let me explain...
We've been having our floors refinished, and everything I own is packed into boxes, including my desktop cmputer. I have my laptop, but it has limited photo software and I couldn't for the life of me get my photos converted to a smaller size. It took me a while to figure it out. Given my limited time to spend "blogging," it took me a couple of days. FINALLY!!! I've got it worked out now. So, without further ado, I present to you: (drumroll, please!)
The sunflowers as they were two days ago!
This butterfly was adamant that I take his picture...so I obliged.
This is a good depiction of how the sunflowers are not all opening up at the same time this year. I blame mother nature.

Many are at this stage.

Just beginning to pop open.

But there are still lots open for good photo ops.

You never know what you might get a chance to capture...either on film or in your own mind.

Sunday, August 15, 2010

Getting There!

The sunflowers are starting to make a show.
Mostly, the field looks like this. Just a few sunflowers here and there starting to pop open.


I love the sunflowers when they are at this stage. The bugs haven't started to eat the petals yet, and they look lovely.


The beetles seem to be starting in on this one already.


You can see how tall they are in this picture. (That's my hubby...the farmer.)

Sunflowers still make a pretty neat model, even when they aren't open yet.

Next weekend should be the best to take pictures. This week more of the flowers will slowly pop open. Just a note to any budding photographers (pun intended), the lighting is best early in the morning and late in the evening. Mid-day sun will wash them out and lots of photoshopping will ensue. Just take my word for it!

Sunday, August 8, 2010

Reach for the Sky!

The sunflowers are still plugging away.
They didn't come up very well this year because of hard rains that hit them
just after they were planted.
You can see lots of bare spots in the field, and they aren't all at the same stage of development.
But they are still plugging away.

What a difference a few days can make!
The sunflowers have doubled their size in a week's time.
I didn't have a yardstick with me and my youngest, who rode her bike to the field with me, absolutely refused to be in the photo...so this is your's truly demonstrating how tall the sunflowers are. Bear in mind that I'm pretty small in stature (5'2") and that I really didn't dress to be photographed. Please forgive me! I'm estimating that the largest are 40 inches tall.
The larger sunflowers are developing flower buds!
My best guess for a good weekend to photograph is the 21st/22nd. I'm betting the field will look it's best on Tuesday, the 24th. I'll keep you informed.