 I've been on a quest to make bread at home that rivals the artisan loaves that I get at our local stone oven bakery. I think I've finally done it! The secret is to bake the bread in a covered dutch oven for part of the cooking time. It makes a wonderfully chewy crust. Just a note on the dutch oven: Mine is a Lodge brand. Don't be fooled by its knob. The phenolic knob that comes with the pot is not oven safe, but it is easily replaced with a $10 LeCruset stainless steel knob bought from Amazon.
This recipe is made with a sourdough starter (use your favorite or I'll supply you with a recipe at the bottom), and milled flax seed. Milled flax seed gives the bread a nice flavor and adds some wonderful looking specks of color. (I am able to buy Hodgson Mill brand at my local gracery store.) Also a note on measuring the flour: I'm of the school that lightly spoons the flour into a measuring cup to overflowing and then uses a knife to level off the top. You'll get the right amount every time that way.
I once reprimanded my daughter for just scooping flour out of the canister with the measuring cup. She insisted it must be the same amount of flour as doing it my way. After a brief experiment, she concluded that her way yielded almost 1/4 cup more than measured my way. She is now as anal about measuring flour as I am. (I couldn't be more proud!)
Here's the recipe that I developed to fit my 6 quart dutch oven:
Sourdough Dutch Oven Bread
2/3 cup sourdough starter
1 cup warm water
2 teaspoons rapid rise yeast
1 teaspoon sugar
1 teaspoon salt
1/3 cup milled flax seed
3 2/3 cup unbleached all-purpose flour
Combine the starter, water, yeast, sugar, and salt in a large mixing bowl.
Stir in the milled flax seed and the flour. Knead the dough until it sticks together and pulls away from the side of the bowl.  (I put my dough in the Kitchenaid and knead it with a dough hook for 5 minutes, but you can do it the old-fashioned muscle-building way and it will work just fine.)
(I put my dough in the Kitchenaid and knead it with a dough hook for 5 minutes, but you can do it the old-fashioned muscle-building way and it will work just fine.) Place the dough in a greased (I spray mine) bowl and cover with a lid or plastic wrap. Let it raise for about 2 hours.
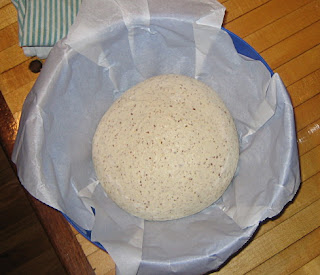
It should at least double in size, although mine usually triples in size because I don't have time to babysit dough. (I have lots of important things to do like laundry and scrubbing toilets.) Line a medium mixing bowl (about the same size as your dutch oven) with parchment paper and set it aside.

Punch the dough down.

Turn it out onto a floured surface and knead it very briefly...more to shape the dough and to get rid of any air bubbles.

Form it into a ball. Place the ball seam side down into the parchment lined bowl.
Cover it with a kitchen towel and let it raise until doubled in size.
At least 20 minutes before the dough is ready, put your dutch oven in the oven and pre-heat it to 475* F. When the oven is ready, slice the top of your dough with a very sharp knife. Just make a 1/4 inch deep slit in the top. If your knife is sharp enough, it won't drag.  This slit helps the dough "pop" in the oven. Carefully lift the dough out with the parchment paper and place it in the dutch oven.
  Place the lid on the dutch oven and bake for 30 minutes.
This slit helps the dough "pop" in the oven. Carefully lift the dough out with the parchment paper and place it in the dutch oven. Place the lid on the dutch oven and bake for 30 minutes. 
Remove the lid (I leave the lid in the oven to prevent cracking the enamel from thermal shock) and bake for another 20 minutes. Remove the bread from the oven (again, I leave my pot in the oven to cool), remove paper, and cool the bread on a wire rack for at least one hour before slicing. (If you slice into the bread too soon, it will become hopelessly gummy.
 After you've patiently waited an hour, go ahead and enjoy.
Sourdough Starter:
2 cups warm water
1 tablespoon sugar or honey (optional)
2 cups all-purpose flour
1/2 teaspoon dry yeast
Beat all ingredients in a 2 quart bowl. Cover the bowl with a cheesecloth and leave it on the counter for 3 to 5 days, stirring it daily. When the bubbles diminish and it developes a sour, yeasty aroma, it's ready to use.
Ingredients:
Ingredients:
2/3 cup sourdough starter
1 cup warm water
1 teaspoon sugar
1 teaspoon salt
2 teaspoons rapid rise yeast
1/3 cup milled flax seed
3 2/3 cup unbleached all-purpose flour
Is 475 F the correct temp? For the whole baking time? Just made this this evening. When I took the lid off after 30 minutes the top was already very brown. I had to take it out after another 10 minutes (not 20) because it was beginning to burn - and the parchment just crumbled!
ReplyDeleteIt's to hot, 450f reduce to 430 then bake for max 20min then again 20 mind same temp or slightly less
DeleteIt's to hot, 450f reduce to 430 then bake for max 20min then again 20 mind same temp or slightly less
DeleteYes, Lisa. 475 F is the correct temperature. It sounds, though, like your oven runs hotter than mine does. I'd try turning it down. My parchment gets very bown and crumbly around the top edges, but stays inact underneath the bread, although it's very brittle there, also. I hope you give it another shot (at a lower temp...maybe try 450 in your oven) because this bread is pretty great stuff. Good luck.
ReplyDeleteWhat do you do with the remaining starter? What are the directions for continuing and maintaining the starter? How do you feed it and when can it be used again? I am assuming the dry yeast for the bread is just regular yeast. Thanks, I enjoy your blog.
ReplyDeleteAnon- To keep the starter going, I add half a cup of flour, and a half cup of water to what remains. Whisk it well and cover with a cheesecloth. Stir daily. It can be used in a couple of days (or less), just give it a whiff and you'll know when it's ready. When I get tired of feeding mine and am not baking as much, I stick it in a lidded jar in the fridge. It keeps fairly well for a week or more, but again, your nose is the best judge of whether a starter is good or has gone bad. And yes, regular yeast is fine. Good luck!
ReplyDeleteWhat size is your dutch oven?
ReplyDeleteoh, nevermind! i see 6 qt now. i was scanning :-/
ReplyDeletewhat happens if my dough didn't rise much after the 2 + hr waiting period?? :-0
ReplyDeleteToo cool in the house or bad yeast would be my guess. If you added hot water to yeast, you could kill it, also. Just buy fresh yeast and rise your dough the final time while sitting on a heating pad turned to low...or put it in an oven with just the light turned on to help keep it warm. Good luck.
Deletewell I always use the oven method to let my bread dough rise, set it in the oven and just turn on the light hat is about 80F and that way it will rise no matter what temp your house is.
DeleteHave you tried using less or no yeast and letting the bread rising for longer? I have been using a recipe where I let the dough rise over night and use 1/4 tsp yeast. The recipe I used has more flour and water than yours and makes a larger loaf.
ReplyDeleteMike, Yes! I've used just about every recipe out there. Currently, I don't have time/patience/fortitude to keep a starter going so I just mix up a batch of no-knead dough (sans starter) the night before and use 1/4 to 1/2 tsp of yeast. Lots of recipes out there for the "no-knead" variety and they're all good. (At least that I've found.)
ReplyDeleteI used your recipe today, but substituted 1/2 whole wheat flour and the rest white bread flour. The first rise looked good. Took a little longer due to the whole wheat. When I punched it down for the second rise, I added about 3/4 cup of raw sunflower seed kernels. I also splurged on a cast iron dutch oven today (6 quart). I had been using a small metal roasting pan (like what you would roast a chicken in). Eager to see how it turns out. I will post results if you wish. Thanks for the recipe.
ReplyDeleteMy pot is actually a Lodge (way cheaper than LeCreuset) but the Lodge lid handle was not oven safe so I replaced it with a LeCreuset handle I bought on-line. When I make a double batch of bread, I also use my (older than me) cast iron dutch oven that I absconded from my mom's attic. Feel free to post results. I can always talk food!
ReplyDeleteThis comment has been removed by the author.
ReplyDeleteDo you ever let your dough rise in the cool crock then put it in the hot oven? My dough "falls" when I transfer it to the hot crock. Thanks.
ReplyDeleteTo get the crispy chewy crust, it needs to go into the hot pot. I've not tried it the other way. I'm sure it would work, you would just end up with a softer crust more like traditional loaf bread, and it may not rise as well in the oven. My dough falls a bit, but it doesn't totally deflate. My guess would be that you are letting it raise too long, perhaps. Try a shorter rise time and see if that helps. Good luck, Andrea!
DeleteI have whole flax seed. Googled Milled flax seed - said it it not ground or crushed, but milled. Can I just grind what I have for this recipe, do you know?
ReplyDeleteThis comment has been removed by a blog administrator.
ReplyDelete